Advanced Linux Shell Scripting for DevOps Engineers with User management.
TASKS:
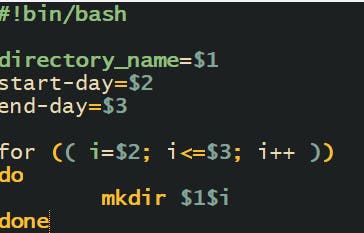
1 . Write a bash script createDirectories.sh that when the script is executed with three given arguments (one is the directory name and the second is the start number of directories and the third is the end number of directories ) it creates a specified number of directories with a dynamic directory name.
Example 1: When the script is executed as
./createDirectories.shday 1 90then it creates 90 directories as
day1 day2 day3 .... day90Example 2: When the script is executed as
./createDirectories.shMovie 20 50then creates 50 directories asMovie20 Movie21 Movie23 ...Movie50Notes: You may need to use loops or commands (or both), based on your preference. Check out this reference: https://www.geeksforgeeks.org/bash-scripting-for-loop/
Ans:-


2. Create a Script to back up all your work done till now.
Backups are an important part of DevOps Engineer's day to Day activities
The video in References will help you to understand How a DevOps Engineer takes backups (it can feel a bit difficult but keep trying, Nothing is impossible.)
Watch [this video](youtu.be/aolKiws4Joc)
#!/bin/bash
Specify the directory to backup
DIR="/home/yourusername/work"
Specify the directory to save the backups
BACKUP_DIR="/home/yourusername/backups"
Create the backup directory if it doesn't exist
mkdir -p $BACKUP_DIR
Set the filename for the backup file
DATE=$(date +%Y-%m-%d_%H-%M-%S) FILENAME="work_backup_$DATE.tar.gz"
Create the backup file
tar -czf $BACKUP_DIR/$FILENAME $DIR
Print a message indicating the backup is complete
echo "Backup of $DIR completed at $(date +%Y-%m-%d_%H-%M-%S). Backup file: $BACKUP_DIR/$FILENAME"
This will create a backup of your work directory in the specified backup directory with a timestamped filename. You can modify the script to customize the directory paths, filename format, or other options as needed.
3 . Read About Cron and Crontab, to automate the backup Script
Cron is the system's main scheduler for running jobs or tasks unattended. A command called crontab allows the user to submit, edit or delete entries to cron. A crontab file is a user file that holds the scheduling information.
Watch This video as a Reference to Tasks 2 and 3 [[youtu.be/aolKiws4Joc]](https://youtu.be/aol..](youtu.be/aolKiws4Joc]
Cron :- Cron is a Linux job scheduler that is used to set up tasks to run periodically at a fixed date or interval. Cron jobs are specific commands or shell scripts that users define in the crontab files. These files are then monitored by the Cron daemon and jobs are executed on a pre-set schedule.
Crontab :- The crontab file is a simple text file that instructs the cron daemon to perform a task at a certain time or interval. Any user may schedule cron tasks or jobs on a system. The task runs under the user account from which it was created. In other words, if you create a cron task, it runs with your user account's permissions. The same is true for any user on the system, including the root user.
Location of crontab :- cat /etc/crontab
4 . Read about User Management
User management is the process of managing different user accounts and their respective permissions in an operating system. In Linux, we can create different user accounts, sort them into groups, change their set of permissions or delete them.
User management includes everything from creating a user to deleting a user on your system.
To create a user account
#useradd Sajid
To check user account properties
#sudo cat /etc/passwd
To create a user account password
#passwd Sajid
For switching user account
su Sajid
For logout from the user account
exit
To delete a user account
userdel Sajid
Group Management
A group is a collection of users' accounts Users can be listed in different groups. Group allows us to set permission on the group level.
To add a group account
#groupadd dev_sajid
To check group account property
#sudo cat /etc/group
To delete the group account
groupdel dev_sajid
To add a single member to a group
#gpasswd -a Sajid dev_sajid
To add multiple members to a group
#gpasswd -M sajid,rajiv,sachin,sunny dev_sajid
5 . Create 2 users and just display their Usernames
Open the terminal and type the following command to create the first user:
sudo adduser user1
You will be prompted to enter a password and other information about the user. Once you have entered all the information, the user will be created.
Next, type the following command to create the second user:
Again, you will be prompted to enter a password and other information about the user. Once you have entered all the information, the second user will be created.
sudo adduser user2
To display the usernames of both users, you can type the following command:
To see all user :- sudo cat /etc/passwd

